Skip to content
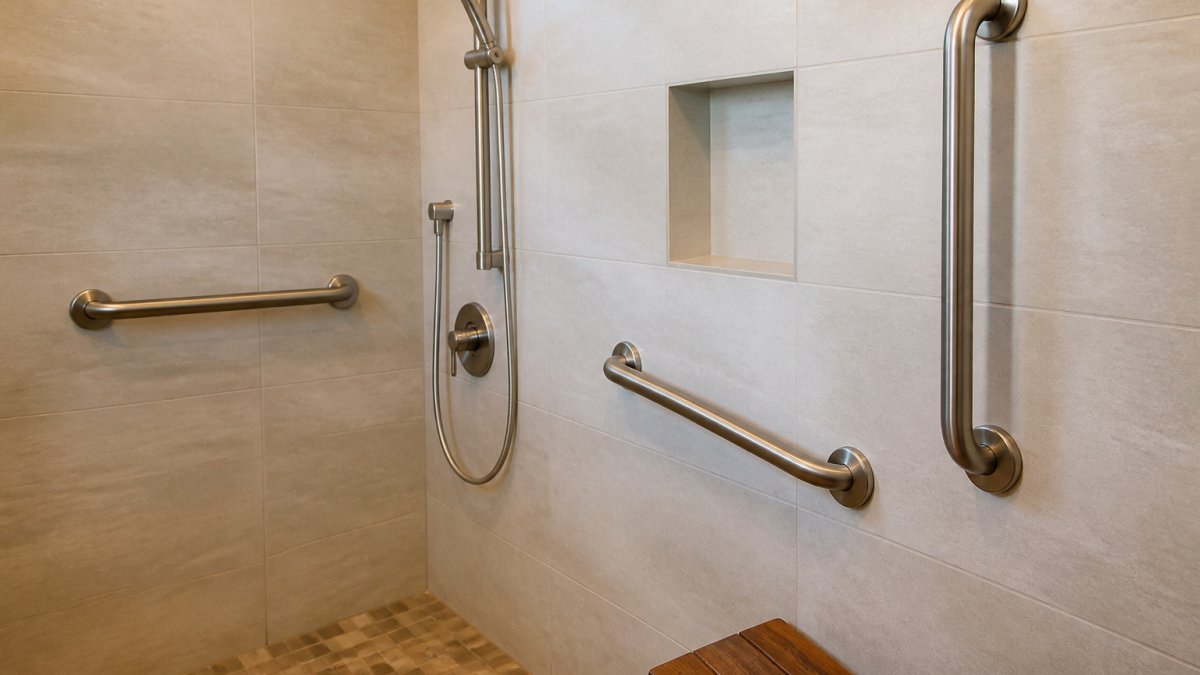
Table of Contents
- Why Grab Bars for Shower Safety Matter
- Shower Grab Bar Placement: Where to Mount for Safety
- ADA Shower Grab Bar Requirements Explained
- Best Grab Bars for Showers: Materials, Sizes, and Finishes
- How to Install Grab Bars in a Shower: Step-by-Step
- Tools and Materials You’ll Need
- Step 1: Locate the Structure [Time: 15 minutes]
- Step 2: Mark and Level Your Holes [Time: 10 minutes]
- Step 3: Drill Through the Tile [Time: 20 minutes]
- Step 4: Anchor and Mount the Bar [Time: 20 minutes]
- Step 5: Seal and Test [Time: 15 minutes]
- Installation Troubleshooting and Structural Reinforcement
- DIY vs. Professional Installation: Cost-Benefit and Universal Design
- Conclusion: Taking the Next Step for Bathroom Safety
- Frequently Asked Questions
Last Updated: October 7, 2026
Why Grab Bars for Shower Safety Matter
Most bathroom falls happen in the shower, where wet tile, soap, and a moment of lost balance combine into a serious risk. At Bentley Baths, over 15 years of research in accident prevention has shown the pattern is consistent: the bathroom is where independence is won or lost. (Source: National Center for Health Statistics data)
A grab bar is not a towel bar or a suction cup. It is a load-bearing safety device anchored into structure, not tile, a distinction that decides whether it holds your weight or pulls out of the wall.
This guide covers placement, ADA requirements, materials, installation, plus the two things most guides skip: structural reinforcement and the real cost-benefit of professional versus DIY installation.
The most common and dangerous mistake is mounting a grab bar with suction cups or into drywall alone. Suction cups fail without warning, and drywall anchors pull out under a sudden load. A grab bar must be screwed into blocking or a stud.
Shower Grab Bar Placement: Where to Mount for Safety
Shower grab bar placement follows a simple rule: put the bar where your hand naturally reaches when balance fails, not where it looks symmetrical.
- Vertical bar at the entry: 24 to 30 inches long, mounted 6 to 8 inches inside the shower, so you can steady yourself stepping over the threshold.
- Horizontal bar on the back wall: 24 to 42 inches long, 33 to 36 inches above the floor, for standing balance.
- Diagonal or angled bar: helpful near a seat or in a tub, following the natural line of your reach.
For most adults, mounting height falls between 33 and 36 inches above the finished floor. If multiple people use the shower, mount to the primary user’s reach and add a second bar rather than compromising.
Placement in Showers vs. Tubs
Tubs need different geometry than walk-in showers. Add a vertical bar at the head end to help you lower and rise, plus a horizontal bar along the long wall.
In a curbless or walk-in shower, prioritize a vertical entry bar and a horizontal bar on the longest wall.
ADA Shower Grab Bar Requirements Explained
ADA shower grab bar requirements are set by the Americans with Disabilities Act Accessibility Guidelines, which specify mounting height, load capacity, and placement for accessible bathing. They apply to public and commercial facilities, but they are also the smartest baseline for any home modification.
The key requirements, per the ADA Standards for Accessible Design:
- Bars must support a minimum load of 250 pounds.
- Standard mounting height is 33 to 36 inches above the floor.
- Bar diameter must be 1.25 to 1.5 inches, with 1.5 inches of clearance from the wall.
For a private home, you are not legally bound to these numbers, but meeting them removes guesswork.
The 250-pound load requirement is the number to remember. It is the difference between a bar that holds you and one that fails when you grab it hard.
Best Grab Bars for Showers: Materials, Sizes, and Finishes
The best grab bars for showers balance corrosion resistance, length, and a finish that holds up to moisture. But the specification most buyers ignore is the one that keeps you safe: how the bar transfers load into the wall.
Material Options and What They Actually Do
- Stainless steel (Type 304): The default for wet environments, resisting rust and pitting from soap, hard water, and humidity. Type 316 is more corrosion-resistant for coastal settings but costs more and is overkill for most homes.
- Brass: Durable, warm to the touch, and often chosen for traditional bathrooms, though heavier and pricier than stainless. Look for a lacquered or powder-coated finish to prevent tarnish.
- Plastic or coated steel: Lighter and cheaper, but suited to light use. A plastic bar can flex under a hard grab, exactly when you need rigidity.
Diameter, Clearance, and Grip
The ADA standard sets bar diameter at 1.25 to 1.5 inches, with 1.5 inches of clearance from the wall.
For grip, choose a textured surface or a knurled or peened pattern; a smooth, polished bar gets slick when wet. Knurling adds friction but can be abrasive on soft skin, so many users prefer a subtle texture or a coated bar.
Length Options and Where Each One Fits
- 12 inches: Tight spaces, next to a toilet, or as a secondary grab point.
- 16 to 24 inches: Vertical entry bars and short wall runs.
- 24 to 36 inches: The most common horizontal back-wall length.
Length should match the reach path, not the wall. A 42-inch bar on a short wall can put the mounting flanges where there is no structure, forcing you into blocking or toggle bolts.
Finishes: Cosmetic, but Not Trivial
Finish affects grip, cleaning, and how clinical the bathroom looks. Brushed nickel hides water spots; chrome is bright, easy to wipe, and the most common commercial finish; oil-rubbed bronze and matte black suit traditional and modern rooms and help a safety bar read as design rather than a hospital fixture. Powder-coated finishes add warmth but can chip at the flanges if overtightened.
Weight Capacity and Load-Bearing
Weight capacity matters most, and it depends as much on installation as on the bar.
Look for a bar rated to at least 250 pounds to meet ADA guidance, and higher for margin. Load-bearing capacity is a partnership between the bar, the fasteners, and the structure they bite into.
A bar’s weight rating describes the bar, not your wall. The rating only means something once the bar is anchored into blocking or a stud. Buy for the rating, install for the structure.
A Quick Selection Framework
- Confirm the wall has structure where you want the bar.
- Pick a length that spans two studs if possible.
- Choose stainless steel for the shower interior.
- Match the finish to the room so the bar does not look clinical.
- Verify the diameter and clearance meet ADA numbers so your hand can close around it.
How to Install Grab Bars in a Shower: Step-by-Step
Total Time: 1 to 2 hours
Difficulty: Intermediate
Installing grab bars in a shower means finding solid structure, drilling clean holes through tile, and sealing every penetration against water. The steps below assume you have located blocking or a stud.
Tools and Materials You’ll Need
- Cordless drill with masonry and tile bits
- Stud finder
- Tape measure and pencil
Step 1: Locate the Structure [Time: 15 minutes]
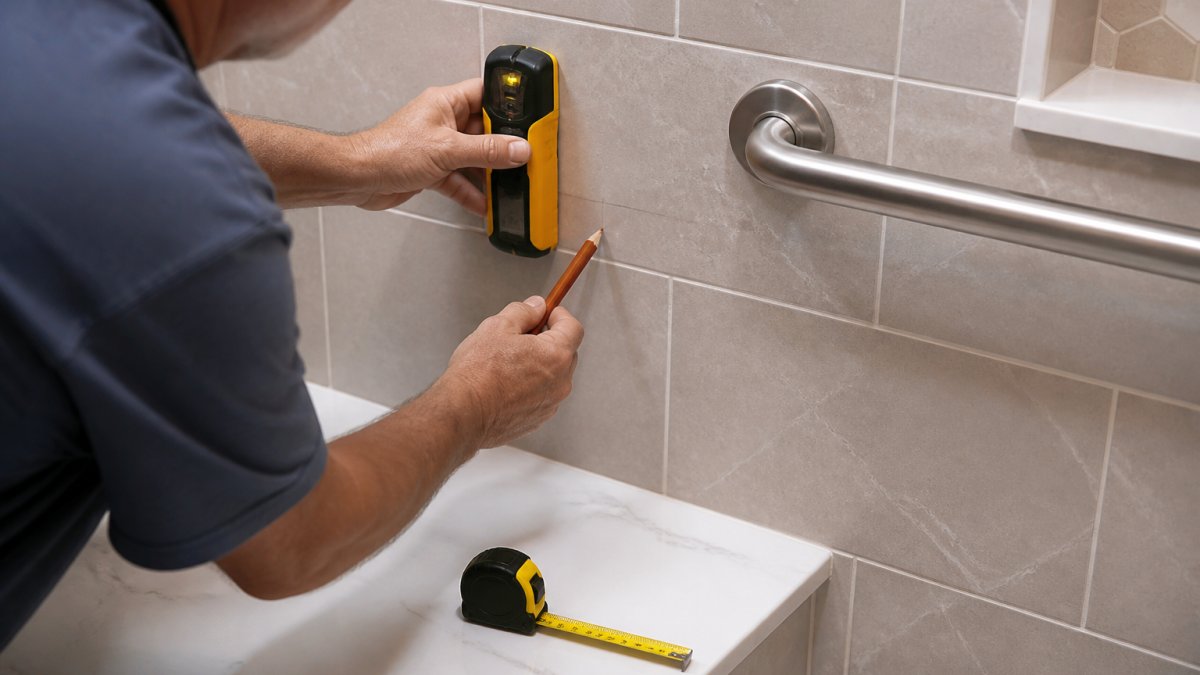
Run a stud finder across the wall and mark every stud; in a shower they are usually 16 inches apart. If your bar spans two studs, you are in good shape. If not, you will need blocking or toggle bolts.
Step 2: Mark and Level Your Holes [Time: 10 minutes]
Hold the bar at your chosen height and mark the flange holes. Check level before drilling, and place masking tape over each mark to keep the tile bit from wandering.
Step 3: Drill Through the Tile [Time: 20 minutes]
Use a masonry bit for tile and a wood bit for the stud behind it. Drill slowly and keep the bit cool. Stop when you reach the stud or cavity.
Step 4: Anchor and Mount the Bar [Time: 20 minutes]
Insert the fasteners: screws directly into the stud, or toggle bolts that spread behind the wall for a cavity. Tighten the flange until the bar is firm with no wobble.
Step 5: Seal and Test [Time: 15 minutes]
Apply silicone sealant around each flange to keep water out of the wall. After it cures, pull firmly on the bar to confirm it holds.
Expected Result: A bar that does not move when you pull on it, with sealed holes that keep moisture out of the wall cavity.
Installation Troubleshooting and Structural Reinforcement
The most common installation problem is a wall with no stud where you need one. This is where structural reinforcement comes in, the step most guides skip.
Options when there is no stud:
- Toggle bolts: spread the load behind the wall; good for moderate support.
- Added blocking: open the wall, install a wood block between studs, then re-tile; the strongest fix.
- Reinforced backing plate: a metal plate behind the tile spreads force across a wider area.
If you are renovating, add blocking now. It costs little during a renovation and saves a major repair later. A stud finder and a level are your two most important tools here.
If your tile is already up and there is no stud, a toggle bolt rated for the load is the practical fix. It spreads force behind the wall instead of concentrating it at the surface, which is exactly where drywall anchors fail.
DIY vs. Professional Installation: Cost-Benefit and Universal Design
Most guides tell you to ‘consider hiring a pro’ and stop there. Here is the framework that actually applies, built around the single variable that determines safety: whether there is solid structure where the bar needs to go.
The Deciding Variable: Structure, Not Skill
Your comfort with a drill is not the deciding factor. What is behind the tile is.
- Studs where you need them: The DIY-friendly case. If a stud finder confirms solid wood at both flange locations, a competent homeowner with a cordless drill, tile bit, and silicone sealant can finish in one to two hours.
- No studs, but accessible blocking or a renovation in progress: Adding blocking is cheap and permanent. If the wall is open, install a wood block between studs before the tile goes back up, the strongest fix, and it costs little during a renovation.
- No studs and finished tile: Your options are toggle bolts rated for the load, a reinforced backing plate, or opening the wall to add blocking. Toggle bolts spread force behind the wall and are the practical fix, but they are a compromise, not equivalent to solid blocking.
When DIY Is Reasonable
DIY is reasonable when all of the following are true:
- You have confirmed studs or blocking at both mounting points.
- You are comfortable drilling through tile without cracking it.
- You can seal every penetration against water.
When to Hire a Professional
Hiring a professional is usually worth it when:
- The wall is finished tile with no studs where you need them, and you want blocking rather than toggle bolts.
- You are installing multiple bars across a shower and tub.
- You are combining the work with a larger accessibility renovation, such as a curbless shower or a walk-in tub.
A professional installation includes proper anchoring, sealing, and a load test, the step most DIYers skip, and the one that tells you whether the bar will hold when you grab it hard.
The Cost-Benefit Logic
A professional install costs labor plus materials; a failed DIY install costs the repair plus the injury the bar was meant to prevent. If the wall has accessible studs, DIY saves labor with low risk. If not, the reinforcement work is the deciding factor, and getting it wrong risks the bar failing when it matters.
A bar that pulls out of the wall under load is more dangerous than no bar at all, because you are already committed to the grab when it fails. Never test a bar by hanging on it casually; test it with a firm, sustained pull after the sealant cures.
Universal Design for Multi-Generational Homes
This is where universal design earns its place, the angle most guides miss. Universal design means building the bathroom so it works for every age and ability, not just today’s user.
The practical version of universal design in a shower looks like this:
- Two mounting heights rather than one, so shorter and taller users both find a natural grip.
- A vertical entry bar at the threshold, which helps everyone, not just someone with a mobility issue.
- A bar beside the seat or tub edge so you can push up rather than pull up.
Planning for multiple users now avoids a second renovation later. If you are already opening a wall for blocking, add a second mounting point while it is open: the incremental cost is small, the retrofit cost is not.
Multi-generational homes where several people of different heights and abilities share one bathroom, and where the goal is safety that does not look clinical.
Conclusion: Taking the Next Step for Bathroom Safety
Getting grab bars for shower safety right comes down to three things: correct placement, solid anchoring, and a bar rated for real load.
If you would rather not guess at structure, Bentley Baths offers free in-home and virtual evaluations by an age-in-place specialist.
Get started with Bentley Baths and turn your bathroom into a secure, therapeutic space you can use with confidence.
Frequently Asked Questions
Where should grab bars be located in a shower?
Grab bars should be placed horizontally 33 to 36 inches above the floor, with at least one bar on the back wall and another on the control wall. Vertical bars near the entry help with standing and stepping. For shower grab bar placement, ensure bars are within reach when sitting or standing and avoid blocking the showerhead or controls. A professional evaluation can confirm the safest layout for your specific bathroom.
Does Medicare pay for shower grab bars?
Original Medicare Part B generally does not cover grab bars because they are considered home safety equipment, not durable medical equipment. However, some Medicare Advantage plans may offer coverage or discounts for bathroom safety modifications. Medicaid waivers and state-based programs sometimes provide financial assistance. Check with your plan and a local area agency on aging to explore funding options for grab bars for shower safety.
What size grab bar is best for a shower?
For most showers, a 24-inch bar works well for vertical support near the entry, while 36- to 42-inch bars are ideal for horizontal mounting along the back and side walls. The diameter should be 1.25 to 1.5 inches for a comfortable grip. ADA shower grab bar requirements specify a 1.5-inch clearance from the wall. Choose a length that allows you to maintain a secure grip without stretching.
Can you install a shower grab bar without drilling into tile?
Suction-cup grab bars exist, but they are not recommended as a primary safety aid because they can lose suction and fail without warning. For reliable fall prevention, drill into wall studs or use proper anchors for tile. If drilling is not possible, consider a floor-to-ceiling tension pole or consult a professional for alternative reinforcement. Always prioritize load-bearing strength over convenience for grab bars for shower safety.