Skip to content

Table of Contents
- Start With Your Actual Bathroom
- Wheelchair Accessible Shower Dimensions and Clear Floor Space
- Roll-In Shower for Wheelchair Users: Design and Layout
- Accessible Shower Grab Bar Placement and Support
- Showerheads, Controls, and Fixtures for Safe Access
- Planning Your Project: What to Measure and What to Ask
- Retrofit Options and Trade-Offs
- Frequently Asked Questions
Last Updated: October 11, 2026
Start With Your Actual Bathroom
Before you buy anything, before you call a contractor, before you spend a dime, you need to understand what you’re actually working with, because how to make a shower wheelchair accessible depends entirely on your space, your mobility, your budget, and what you’re trying to accomplish.
Here’s the reality: how to make a shower wheelchair accessible depends entirely on your space, your mobility, your budget, and what you’re trying to accomplish. A curbless roll-in shower works beautifully for some people. For others, it’s overkill. For still others, it’s impossible without gutting the whole room.
Start by measuring. Measure your bathroom width, length, and ceiling height. Measure the doorway. Measure the distance from the bathroom door to where the shower currently is. Measure twice. Then measure again.
Next, answer these questions honestly:
- Are you using a wheelchair full-time, part-time, or planning ahead?
- Can you transfer from a wheelchair to a bench or seat, or do you need to shower in the chair?
- Do you have a caregiver helping, or are you managing alone?
- What’s your budget range?
- Do you own or rent?
These answers determine everything that comes next. Your bathroom isn’t generic. Neither should your solution be.
Take photos of your current bathroom from multiple angles. If you’re working with a contractor or specialist, those photos save time and prevent misunderstandings.
Wheelchair Accessible Shower Dimensions and Clear Floor Space
A wheelchair accessible shower starts with space. Specifically, clear floor space where you can maneuver.
The Americans with Disabilities Act (ADA) provides guidance on accessible bathroom design. For a wheelchair user to enter and position themselves in a shower, you need clear floor space. The minimum is typically a 5-foot turning radius, though that’s tight.
Here’s what that means in your actual bathroom:
- Entry clearance: At least 32 inches wide to get the wheelchair through the door
- Maneuvering space inside the shower: A minimum of 36 inches wide and 48 inches deep for a roll-in shower, though 60 inches deep is more comfortable
- Clear floor space outside the shower: At least 60 inches to allow the wheelchair to approach and position for transfer
If your bathroom is smaller, you have options. A corner shower takes less floor space than a rectangular one. A folding shower seat reduces the space needed for transfers.
The point is this: measure first, then design around what you actually have.
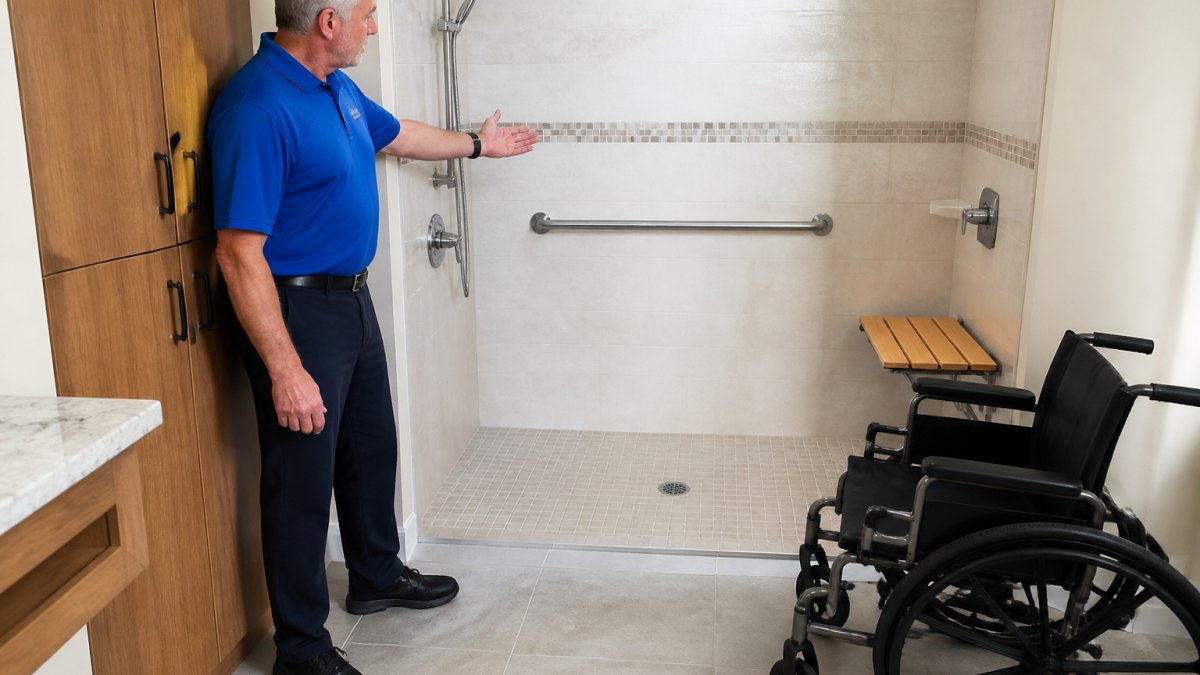
Clear floor space is non-negotiable. Without it, a wheelchair user can’t position themselves safely to shower, transfer, or exit. Measure your actual space before committing to any design.
Roll-In Shower for Wheelchair Users: Design and Layout
A roll-in shower is what it sounds like: a shower you can roll a wheelchair directly into. No curb, no step, no transfer needed if you want to shower in the chair itself.
Here’s what makes it work:
Level-Entry and Curbless Shower Floors
The floor is the foundation. A curbless shower floor slopes gently toward the drain so water doesn’t pool in the rest of your bathroom. The slope is subtle, usually about 1/8 inch per foot. You won’t notice it when you’re in there, but the water will.
The floor itself should be slip-resistant. Textured tile, non-slip coating, or specialty shower flooring all work. Smooth tile in a wet bathroom is how people fall. Don’t do it.
The threshold between the bathroom and the shower should be level or nearly level. A lip higher than 1/4 inch becomes a barrier. That’s where wheelchair wheels catch.
Drain Placement and Waterproofing
The drain location matters more than people realize. A drain in the center of the shower works well for a roll-in design. A drain at the far end means water has to travel across the entire floor, which increases the risk of pooling.
Waterproofing is critical. This isn’t cosmetic. A leak behind the walls leads to mold, structural damage, and expensive repairs. I recommend a waterproof membrane under the tile, not just grout. Grout is porous. Water finds its way through.
When you’re comparing contractors, ask specifically how they handle waterproofing. “We use good grout” is not an answer. You want to hear about membrane systems, sloped substrates, and proper drain installation.
Poor waterproofing is invisible until it’s expensive. A contractor who skips this step saves time and money upfront. You pay for it later. Get everything in writing about waterproofing methods before work begins.
Accessible Shower Grab Bar Placement and Support
Grab bars aren’t decorative. They’re structural. A grab bar holds your weight during the moment you’re most vulnerable: getting up, sitting down, or steadying yourself on a slippery floor.
A proper grab bar is mounted into the framing of the wall, not just the tile or drywall. The mounting hardware goes through the tile and into the studs behind. If it’s not anchored to the framing, it will fail when you need it.
Here’s where they should go in an accessible shower:
- Horizontal bars on both sides of the shower entrance: These help you enter and exit
- Vertical bars near the seat or bench: These help you sit down and stand up
- Horizontal bars along the wall where you’ll be standing: These provide stability while you’re washing
Space them so you can reach them naturally. Bars that are too high or too far apart don’t help. Bars that are too close together get in your way.
Use 1.25-inch diameter bars. That’s thick enough to grip comfortably and thin enough not to feel clunky. Stainless steel or coated steel resists corrosion.
Transfer Approaches and Caregiver Access
If a caregiver is helping, the shower layout needs to accommodate both people. That means clear floor space for the caregiver to stand and assist without getting soaked or cramped.
A bench or seat in the shower works for some people. Others prefer to transfer from the wheelchair to a shower chair. Some people can stand with support and don’t need a seat at all.
The transfer approach depends on strength, balance, and what your body can do. A physical therapist or occupational therapist can assess this. It’s worth the consultation. A wrong transfer method leads to falls and injuries.
If you’re designing for a caregiver, consider:
- Adequate space for the caregiver to stand beside or behind the person showering
- Grab bars positioned so the caregiver can assist without blocking them
- A non-slip floor throughout, not just in the shower itself
- Easy access to controls so the caregiver can adjust water temperature and flow
Showerheads, Controls, and Fixtures for Safe Access
A standard showerhead mounted at 6.5 feet high doesn’t work if you’re sitting. A handheld showerhead gives you control. You can aim it, adjust the height, and hold it steady.
Mount a handheld showerhead on a slider bar so you can adjust the height as needed. A fixed handheld holder at one height limits your options. A slider bar lets you move it up or down.
The controls should be reachable from where you’ll be sitting or standing. If you’re using a bench, the controls should be within arm’s reach from the bench.
Temperature control matters. A mixing valve that prevents scalding is essential. Water that’s too hot can burn you, especially if you have reduced sensation or can’t move quickly.
Consider lever handles instead of knobs. Levers are easier to operate with one hand, with limited grip strength, or if your hands are soapy.
Test the water pressure and temperature before committing to a design. Some people need lower pressure to avoid losing balance from the force of the water. Others find low pressure frustrating. Know what works for you.
Planning Your Project: What to Measure and What to Ask
If you’re working with a contractor, here’s what you need to measure and clarify upfront:
Measurements to take yourself:
- Bathroom width and length
- Doorway width and threshold height
- Distance from door to current shower
- Ceiling height
- Location of existing plumbing and drain
- Electrical outlets and switches
- Any structural obstacles (support beams, pipes, vents)
Questions to ask a contractor:
- How do you handle waterproofing? (Listen for specific membrane systems, not vague answers)
- How are grab bars anchored? (They should go into framing, not just tile)
- What happens if you find damage behind the walls once you start? (Get the process in writing)
- What’s included in the estimate? (Tile, labor, waterproofing, grab bars, fixtures, or just some of these?)
- What’s the timeline?
- Who handles the plumbing and electrical work? (You or licensed subcontractors?)
- What warranty comes with the work?
- Can you provide references from recent accessible bathroom projects?
Get everything in writing. A verbal estimate that changes midway through is how people end up overspending and frustrated.
| What to Measure | Why It Matters | What to Do |
|---|---|---|
| Bathroom dimensions | Determines if your design fits | Measure twice, write it down |
| Doorway width | Wheelchair must fit through | 32 inches minimum |
| Drain location | Affects shower floor slope | Note exact position |
| Wall framing | Grab bars need solid anchoring | Check if studs are accessible |
| Plumbing location | Determines where controls go | Photograph existing pipes |
| Ceiling height | Affects showerhead placement | Measure from floor to lowest point |
Retrofit Options and Trade-Offs
Not every bathroom needs a full remodel. Sometimes a smaller change solves the problem.
A tub cut removes part of the front wall of an existing tub, lowering the entry point.
A transition tub is a hybrid between a traditional tub and a walk-in tub.
A walk-in shower is different from a roll-in shower.
The trade-off is always between cost, space, and what your body actually needs.
Here’s my question for you: What is actually becoming harder? Is it balance? Entry? Transfer? Getting up?
At Bentley Baths, we start with diagnosis, not sales.
Before you commit to a contractor or a design, I also recommend a free safety assessment. It’s not a sales call.
The goal is independence and safety in your own home. That looks different for every person.
Frequently Asked Questions
What are the minimum dimensions for a wheelchair accessible shower?
A wheelchair-accessible shower needs a minimum clear floor space of 5 feet by 8 feet to allow for entry, maneuvering, and turning. The shower opening should be at least 32 inches wide for wheelchair passage. A level-entry or curbless floor is essential so the wheelchair can roll in without obstacles. These dimensions come from accessibility standards that ensure you have enough room to enter safely and reposition yourself during bathing.
Can an existing shower be modified to be wheelchair accessible?
Yes, but it depends on your bathroom layout and the existing plumbing. Retrofit options include removing the tub and installing a roll-in shower, cutting down the tub wall for transfer access, or adding grab bars and a shower seat to an existing stall. The most practical solution depends on your floor space, current drain location, and whether you need a fully curbless entry or just easier access. A professional assessment of your specific bathroom will tell you what’s realistic.
Where should grab bars be placed in a wheelchair accessible shower?
Grab bars should be installed 33 to 36 inches above the finished floor and mounted securely into wall studs or blocking. Place one bar horizontally on the back wall at the entry point for support when rolling in, and another on the side wall near the shower seat or transfer area. A vertical grab bar near the entry helps with positioning. All bars must be 1.25 to 1.5 inches in diameter and support at least 250 pounds. Proper placement depends on your specific transfer method and mobility.
What’s the difference between a roll-in shower and a transfer shower for wheelchair users?
A roll-in shower has a level or nearly level entry so the wheelchair rolls directly into the shower space. A transfer shower typically has a low curb or step that requires you to transfer from the wheelchair to a shower seat or bench. Roll-in showers offer more independence if you can manage showering from the wheelchair. Transfer showers may be easier to retrofit into existing bathrooms with limited space. Both require grab bars, non-slip flooring, and proper drainage. The right choice depends on your mobility, bathroom layout, and whether you need caregiver assistance.
If you’re ready to figure out what actually makes sense for your bathroom and your body, schedule a free evaluation. You’ll talk with me directly. Bring your questions, your measurements, and your honest assessment of what’s getting harder. We’ll walk through your options together and help you make a decision you won’t regret.
BentleyBaths.com
800-688-0055
George@GeorgeBentley.com